Saturday, April 30, 2011

Rick Rack Score

Rick Rack has a proud history in our family.  My mom LOVED it.  She made a lot of our clothes when we were young, and rick rack was her embellishment of choice.  She would have loved to see all the quilts that now include rick rack.  

I love it too - reminds me of mom, but it also makes me think of adding smiles to my projects.  Imagine how happy I was to find this huge bag of trimmings at my favorite thrift store, mostly rick rack.  All of this for $4.98!  Score!  I probably couldn't buy four individual packs for that much today.  The packaging was almost as much fun as the trims.  There is a scrapbooker inside me that wants to make a page with all of those funky labels.

I couldn't wait to dig into this new treasure, so I made a new Kindle/Nook cover for my shop:


I've already started working on the next podcast, so I'll be back on my regular schedule of every other Sunday.

Oh, and if you haven't yet "liked" my page on Facebook, please do - I'm hoping to get to 200 "likes" this weekend.  There's a link on the right sidebar.


Thursday, April 28, 2011

My New Studio Organization Idea

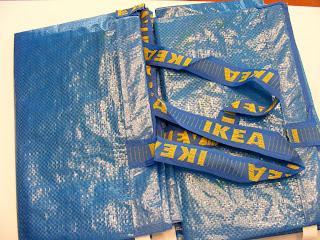
I went to Ikea yesterday looking for some cute storage, but decided these 59 cent ugly bags may work better for what I had in mind. They're not pretty, but these bags hold a TON of stuff.  They are sold at the checkout stand.

After my recent studio clean up, I found a bunch of stuff that's necessary, but I don't need want to look at all the time.  For example, the batting, fusible fleece, and plain sheets I use when making items for my Etsy shop.  So, I'm going to stuff these sturdy bags, and then hang them from hooks in my utility/laundry/junk room.  Another ugly place in the house, but it gets the job done.

I've also used these bags for taking towels to the beach, and storing bulky holiday decorations.  Any other ideas for them?


Posted by Picasa

Tuesday, April 26, 2011

QuiltedCupcake Podcast Episode 42 Show Notes

Here are the show notes for the latest QuiltedCupcake Podcast Episode, Number 42: I'm Back!

Here's the sewing machine fabric tote I made to take to the AQS show.  

And, this is by far the best photo I've ever taken of the inside of a bag.  It's the lining for the sewing tote above.  I included a pocket, and a sewn-in key holder.  I like attaching my change purse to the little "leash", making it easy to find my money while at a quilt show.


Let's follow that up with a really bad picture of the new shelf in my studio.  Here's the link to it at Target, where you can see better photos.  I did buy a new track light for the studio, so better photos are hopeful for the future!

Finally, here's the cool EZ Quilt Easy Dresden Ruler with the little fan block I made so I won't forget how to do it when I'm ready to do a bigger project!


Remember to email me with your thoughts re: an Etsy episode, and ideas for American Girl clothes.

So glad to be back!


Monday, April 25, 2011

New Podcast is Up!

The new podcast is up, and posted to iTunes.

I mistakenly called it episode 41, it's actually number 42.  And, there is a bit of an editing issue near the end, which I'm going to try to fix.  Serves me right for taking a break - guess I'm a little rusty.  I'll have show notes up by tomorrow.

Here's a sneak preview of one of things I talked about in 41, I mean 42!  It's the doll in the same tree I posted about on Easter.  Her outfit will be in my Etsy shop later today.

Sunday, April 24, 2011

Pink Tree = Happy Easter

Found this pretty pink tree while out photographing my doll clothes.  
Thought they'd be the perfect photos to wish a Happy Easter to all!

Posted by Picasa

Saturday, April 23, 2011

Friday, April 22, 2011

18 inch Doll Clothes

American Girl Doll clothes.  Who would have thought I, the mother of 2 sons, would be making 18 inch doll clothes?  I don't watch Project Runway, and I've never really sewn clothing.  But, I did make clothes for my nieces' Barbie dolls when I was younger, and I've learned a few sewing tricks since then.   I also found that a lot of the American Doll clothes that are currently available are either super-expensive, or of poor quality (in the case of what you can buy at Wal Mart, etc.)  

So, I found a bunch of fun fabric (remember this post?), and got to work, making a new line of 18 inch doll clothes for my Etsy shop.   My goal is to make cute, affordable fashions for dolls.  Kind of like an American Girl H&M.  Here are a few things I've made so far, and listed.


I'll have more about this project on my upcoming podcast.  It's been a fun project, I'm learning a lot, and I'm having a ball!  I now have a legitimate excuse to use lots of pink fabric.  I'm even learning to sew knits.

If you know anyone who needs some cute American Girl or 18 inch doll clothes, I'd appreciate if you'd share my Etsy shop with them.   I have a new URL: www.quiltedcupcake.com that will take you right to my Etsy page.  I'm working on some pretty party dresses and ballerina costumes, too.


Wednesday, April 20, 2011

More QuiltedCupcake News

I have some good news for those of you that miss the QuiltedCupcake podcasts - they're coming back soon.

After much soul-searching, I've decided to resign from SeamedUP and focus my creative efforts on my QuiltedCupcake blog, Etsy shop and podcast.  I wish Allison and Brye all the best with the SeamedUP project.  

I have some really fun stuff planned for the QuiltedCupcake world, including:
  • More tutorials  
  • Another quilt challenge
  • A new line of American Girl 18 inch doll clothes for my Etsy shop
  • Continued fun on my Facebook page
  • New podcast this weekend

Thanks to everyone for your continued support - it means the world to me!  As always, feel free to send me an email at quiltedcupcake@gmail.com with any show ideas, or suggestions for the blog.

I'll post to Twitter and Facebook when the new podcast has been uploaded.


Monday, April 18, 2011

Tea Time Creations

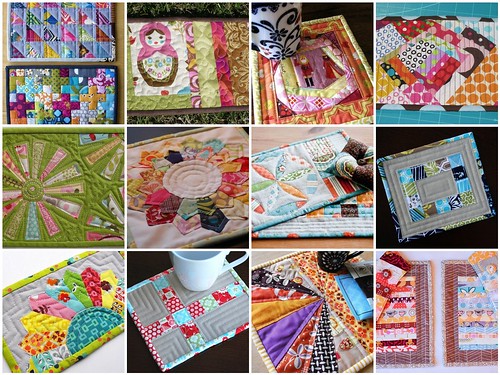
Some of you may recognize Marceli from the online quilting community and her podcast, Whole Lotta Singer.  She's just started a new venture that I wanted to share with you.  It's a new Etsy shop called Tea Time Creations.  Here's a sneak preview of her offerings:


Tea Time Creations offers re-purposed fine china creations and more... Beautiful custom made tea/cake stands, vintage china, custom drilling, as well as supplies and instructions for people to create their own heirloom pieces.


Best wishes to Marceli on her new shop!


Saturday, April 16, 2011

Flickr Feature

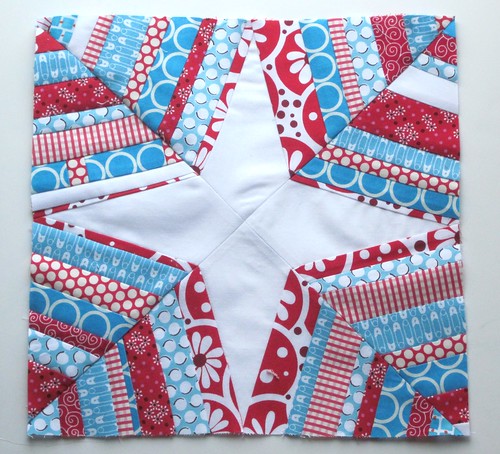
Sarah's Spiderweb Block by PinkPlease!
Sarah's Spiderweb Block, a photo by PinkPlease! on Flickr.
Love this Spiderweb block, posted by PinkPlease on Flickr.   It was designed using a tutorial by one of my favorites, Elizabeth Hartman (Oh Fransson).  You can find the tutorial at Sew Mama Sew.  I can't wait to try it.

Thanks for the inspiration, PinkPlease!  Great colors, and a great design = yummy eye candy!  

Wednesday, April 13, 2011

A Flower Garden

Today's blog post is brought to you via my mom, Lucy.  I found this little table topper at the back of a linen closet as I was cleaning last weekend, just in time for spring.  I'd completely forgotten about it.  Probably been in that closet for years.  Again, made from her favorite flower garden pattern, hand stitched.


It was a little stained, but an Oxi-Clean soak took out most of them.  It's nice to brighten up my table with a treasure like this.  I still miss her every day, but love having bits of her work to remind me of her, especially a little surprise one.  The boys noticed it, and it gave us an opportunity to share nice memories.  That's the wonderful part of handmade crafts - they tell a story, and always keep a bit of the artist in them.

Tuesday, April 12, 2011

New Projects Underway

I bought a bunch of fabric this weekend to use for a new set of projects.  I haven't finished anything yet, but the fabric's so pretty that I had to share.  This picture may give you an idea of what's up - or not. 

As you can see, it's definitely going to be girly, so you know it's not anything for the folks who live here!  I'll post more details when I have a few things complete.  Stay tuned.

Monday, April 11, 2011

Cake Pops

I wanted to hate these Cake Pops from Starbucks.  I really did.  I scoffed at the number of calories for one little pop, I said they'd be dry or not worth it.  But, my friend and I decided to try them yesterday, purely for research purposes, and because of the dedication I have to you, my blog readers.


It was awesome!  I had the "birthday cake" pink one (of course!)  It was super moist inside and dare I say so sweet that I couldn't eat more than one.  

Makes me consider buying one of these (feel free to laugh at me).
So, has anyone tried these Starbucks cake pops?  What do you think?

Saturday, April 9, 2011

Need Clipart?

How cute are these?  I know that lots of people have blogs, Etsy shops, etc.  I wanted to let you know about one of my favorite sources for clip art.  She's the person who designed the cupcake in my QuiltedCupcake logo, so she has a special place in my heart.   It's an indie artist named Jessica Weible.  Her style is fun and whimsical, and I love the variety of clipart she offers.  Here's her card:

Her prices are very reasonable - many clipart singles (like the 2 cupcakes above) are only $1 each, and they're super-high quality.  You get both a JPEG and an PNG file, which I've recently learned is the transparent version. (see: Old dog, new tricks).  And, she regularly offers freebies.   There are tons of themes, and they'd be perfect for coordinating a birthday party invitation, cupcake toppers, etc.  You can buy clipart directly from Jessica's website or through her Etsy shop.  Be sure to sign up for her newsletter, where you can get discounts, and see her latest work.

Here are a few more of my recent downloads:


I've never met Jessica, but I have a feeling we'd get along just fine. 

Look for these to start showing up on my blog, and in my shop.  I've already used the two birdies on a branch to create a new Etsy header - you can check it out here.

Thursday, April 7, 2011

Vanilla Frosting Bargain

Note to the corporate world:  it is officially not possible for me to resist any product that's offered with a "Vanilla Frosting" scent.  And I bet I'm not alone!  I didn't need any of these, but I bought them.

 
Those clever marketing geniuses at Joann had these in the $1 bins that you have to browse through as you wait in line (I think that's a law, you must shop $1 bins). Vanilla frosting-scented shower gel, hand lotion and anti-bacterial lotion.   How could anyone resist?

A little tip: I'm so not a germaphobe; however, I do keep anti-bacterial lotion in my car - I use it after digging through stuff at thrift stores or yard sales.  If that lotion can smell like frosting, so much the better, right?  I also keep hand lotion in the car, and use it when I'm waiting at long traffic lights.  Does anyone else do that?

Monday, April 4, 2011

Free Polka Dot Bunny Tutorial

This is my free Polka Dot Bunny Tutorial.  They are so much fun to make, and make great gifts.  Even great for babies, as the face is embroidered.  I'd skip the ribbon if you're making a bunny for a baby.  Here's what the finished bunnies look like.

To download the free pattern, visit my Scribd page here.  Full instructions follow after the photo:


Materials needed:  

1/4 yard (or less) flannel (a great scrap project)
Small bit of felt for face
Embroidery floss for face
Poly-fil for stuffing
  1. Print out 2 of the pattern sheets from my Scribd page.  Tip: After printing, I like to paste them onto manila folders before cutting - makes them stiffer.  Cut one pattern of bunny shape, one pattern of face piece.

  2. Cut two face pieces from felt.  (I use 2 pieces to give it extra depth, this is optional, though).

  3. With right sides together, trace the bunny shape on wrong side of main fabric.

  4.  Holding both pieces of main fabric right sides together, "Rough cut" the bunny shape with at least a 1 inch seam allowance.  This will help in placement of the face.  You're going to sew on the outline shape in step 7.

  5. Embroider the face on one piece of felt, using diagram as a guide.  I like to put a piece of stiff non-fusible interface under the felt when I embroider, but this is optional.  I made French knots for the eyes so it's baby-safe, but you could also use beads or safety eyes.  When done, sew embroidered face to other piece of felt.  Then, pink edges - this helps to even out any rough spots.

  6. As shown, position finished face on front of bunny (this is why we rough cut, remember?).  Hand-embroider face to front of bunny.  (You could also just sew it on your machine.)

  7. Place two bunny pieces right side together, and stitch along the outline you drew in step 3.  I find that following this outline results in a better finished piece.  Be sure to leave a small opening in the bottom so you can turn it later.

  8. Use pinking shears to cut out the bunny shape with a 1/4 inch seam allowance.  Clip curves.

  9. Turn right side out, using a chopstick to poke out the ears and curves as needed.

  10. Once ears are properly shaped, topstitch along both ears, and where the ears meet the head.  The ears aren't stuffed, so this keep stuffing from traveling up there later.  Don't gather the ears yet, that's the last step.

  11. Stuff the bunny with poly-fil and hand sew bottom seam.

  12. Pinch ears together, and hand sew a tuck at the base of each.  Then, add ribbon bows as desired.  For little ones, the fewer embellishments, the better.  For older kids, accessories or even clothes could be added.
I hope you enjoy this tutorial.  Make as many as you like, feel free to link to this tutorial, grab pictures, post it on your blog, tweet about it, whatever you like.   

I'd love to see any bunnies you make from the pattern.  Please post them in the Quilted Cupcake Flickr group here.


Sunday, April 3, 2011

Bunnies Tutorial Sneak Preview

I'm working on a new free tutorial for these bunnies that I designed.  I'm calling them "Polka Dot Bunnies," but you could make them in any fabric you like - flannel, cotton, corduroy, fleece, etc.  I plan to have the pattern and instructions posted on Monday.  Depending on how folks like this one, I may offer more tutorials here - what do you think?

 
They're pretty easy to make, and I expect there will be more in my studio soon (they are rabbits after all ;).   I took photos with my new iPod Touch as I made the brown polka dot one.  Please check back on Monday for the instructions.  I'll also tweet when it's posted.

Saturday, April 2, 2011

Owl Plushie

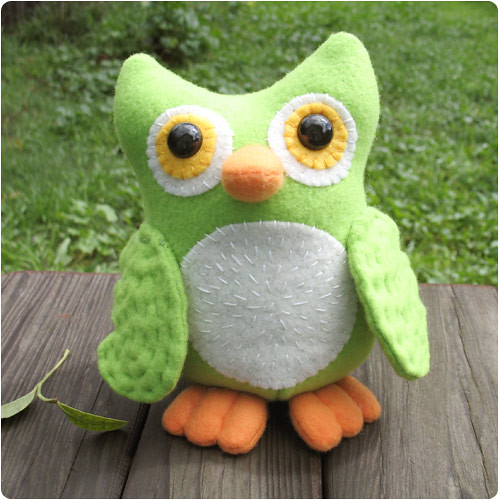
Owl Plushie by Gleeful Things
Owl Plushie, a photo by Gleeful Things on Flickr.
How cute is this Owl? It was created by Gleeful Things for a swap.  Here's a link to her blog.

I love all the details in the stitching.

Wouldn't you like to be her swap partner?