Wednesday, November 30, 2011

Giveaway Time: Olfa Scissors

Great news!  The Olfa folks have agreed to provide a pair of the  5" Olfa Precision Applique Scissors to one lucky blog follower.  I reviewed them, and love them!

Entering to win these awesome scissors is easy.  Two simple steps, or only one if you already follow my blog!

  1. "Follow" my blog - see that group of sweet faces on the right sidebar labeled members with the "Join this site" button on top?  Click on the button, and follow me.
  2. Leave a comment on this post.  Something like "I'm a follower" - easy peasy, right?
I'll choose a random winner from all the posts made by Saturday at 11:59 p.m.  Note: Please be sure that I can find your email address from your post, so I can let you know if you won.

Monday, November 28, 2011

Cupcake Taggie Blanket: Supersized

Hope everyone had a super Thanksgiving weekend (for those in the US). I had lots of time for sewing on my new Janome machine - loving it!

I finished a bunch of new Etsy orders, including this custom Super-sized Taggie blanket. It's all cupcake flannels and fleece.  It's 48" x 48", with taggies all around.
It's such a joy to work with my favorite fabrics, and to know that this blanket will be going to a sweet little one year old for Christmas.  Just call me Santa Cupcake!


I like the back almost as much as the front. Super soft pink and white polka dot fleece - seriously? Like I could leave that at the store? No way!


Also, BTW, wanted to let everyone know that I am going to be doing another QuiltedCupcake Project Night Night Challenge in early 2012.  I decided to move it to after the holidays, so we'll all have more time to plan and quilt.  I hope we can beat last year's 20 quilts.


And, remember, Thrifty Thursdays resumes this week!  Get your linkies ready.


Posted by Picasa

Wednesday, November 23, 2011

Product Review: Olfa Scissors

I recently received a great pair of scissors to review from Olfa. The scissors are officially called the 5" Olfa Precision Applique Scissors.  There's a lot to like about these babies.  First off, they're super sharp, with great tips to really get into small places.  I like the size, too.  Not so small that I lose them all the time, but not so big that they're in my way.  The holes for your fingers are a good size, too.  Allows for lots of control.


The picture on the package shows another advantage - the blades continue up into the handles, making the scissors feel much more secure when you use them.  No wobbly handles.

Although they're designed for applique, I found that they work just as well in my studio whenever I need a sharp pair of scissors.  For example, I've been making these little pod cases.  After you sew around the circle, it helps the case to lay flat after turning if you first use pinking shears on the edge, and then go back and clip the little "valleys" between the mountains.  I know most of my other scissors wouldn't have been able to do that precision cut.
They're a great choice for really getting into the spots you need with accuracy.  

The only drawback I can see is that they are a bit spendy at $24.99 MSRP; however, they are a quality cutting tool.  And, you can probably find them at Joann's or Hobby Lobby and use a coupon.

I've asked the manufacturer for a pair to give away to blog readers, too.  I'll let you know if that happens.


Note to readers:  although I did receive these scissors free from the manufacturer, the opinion in this blog post  is my true and accurate review.  Whenever I review a product, I promise to give you the straight scoop.  If I don't like something about a product, I'll let you know, whether I bought the product or not.  Just so you know.

Monday, November 21, 2011

Janome Cover aka the Lunch Lady Apron

I just finished my first project on my new Janome machine. I called it the "lunch lady apron" machine cover. I needed this design, as I'm keeping the extension table set up all the time. A traditional 4-sided cover wouldn't work. Here's a link to a bunch of great sewing machine cover tutorials created by The Tip Junkie.
For my version, I used sewing themed fabric found at Stitches, Etcand basically made a little fleece backed quilt that would cover the machine.  Anyone know the fabric's designer?  If so, please leave a note in comments.      ETA: Thanks, Edie for the details.  The fabric is called Sew Border, from Makower UK.  I'm not surprised - I love many of that company's fabrics.
The lunch lady name comes from the ties on the side.  The ladies who always helped at my school's lunch hour (including my mom) always wore aprons that tied on the side.  We called them lunch ladies, so that's the first thing that came to my mind when I added them to the cover.

The other good thing about this design is that it will also work if I don't have the table attached to the machine. When not in use, I'm hanging the cover up in my line of sight so I always remember to put it back on the machine when I'm closing down the studio for the day.

As part of my studio remodel, I also moved my thread holder to be right above my machine.  So much easier.  And, I added a smaller one below the original spool holder dedicated mostly to colored bobbin threads.  Love having all that color right in front of me as I sew.

Thursday, November 17, 2011

Thrifty Thursday #6

Thrifty Thursday's here.  After my big purchase yesterday, I need all the thrifty ideas I can find.

Note: this will be the last Thrifty Thursday until 12/1 - taking next week off due to Thanksgiving here in the U.S.

So, let's get this week started.  Remember, this party's pretty flexible.  Thrifty crafts, yard sale goodies, recipes, anything that relates to Thrifty is OK to add.

Wednesday, November 16, 2011

Janome in the House!

After much consideration, research and justification, this baby's now sitting in my (still unorganized) studio.  It's the Janome 6300P Memory Craft Professional.   After this past weekend's quilt marathon, I realized it was time to invest in a professional quality machine.  My Singer Confidence Quilter (only about a year old) has been acting up, making it harder and harder to use.  Honestly, I think I just worked it into the ground!   The 6300P is perfect for me.  It has all the things I wanted, and none of the stuff I won't use.  And, it's FAST! 

At $1,000, it wasn't an easy decision to make.  However, after just one evening of sewing, I don't think I'll be regretting it.  Besides, I think this sewing thing is going to last for me - it's not a phase.

Look for a more complete review once I've put her through her paces.  And, she needs a name.

Anyone out there have this machine?  Please let me know what you think.

Monday, November 14, 2011

TuTu Tree Tutorial

Regular blog followers (or podcast listeners) know that I'm a big fan of all things Pink.  With 4 males in the house (including the dog), I don't get to use much pink.  So, I decided to make myself an over-the-top Pink Christmas tree for my studio. It's a TuTu Tree!


 I originally saw a similar idea on Pinterest, but the tree was made with netting.  I didn't care for the big holes and "rough" appearance. It was an easy project, but the directions were a little hard to follow.  So, I changed it up to make it softer and girly with fine tulle and created an easy tutorial with pictures.  I can see making these in multiple shades. So, if pink's not your thing, pick your favorite color and go nuts!

My tree uses 1/2 of a dowel as the base, and measures about 18 inches tall .  If you want a bigger tree, you use the whole dowel and add more layers.

Here's the Quilted Cupcake Tutu Tree Tutorial 
if you want to make your own. 

Supplies:

4 yards of fine mesh tulle (Joann's has a whole aisle of tulle in many colors).  Pick whatever color you like
1 Wooden dowel - about 1/2" diameter, but just about any size will do.
Thread and needle
Candlestick with an opening or a container filled with rocks to hold the finished tree
Bow for the top (optional)

Step One: Cut dowel in half.  

Step Two:  Cut the tulle

You need to cut the tulle into a bunch of long strips, each the width of the tulle.  You may find it easier to do if you cut your piece of tulle into two 2-yard pieces, so it's easier to handle.  

The best way to cut this slippery  fabric is to fold the tulle with selvage sides together and then, fold again.  So, if your tulle was 72" wide to start, you'll have a folded piece that's 4 (or 2) yards long and 18 inches wide. 

Now, lay the folded tulle on your cutting mat and use a rotary cutter and ruler to slice sections in decreasing widths, beginning with 15", then 14", 13", 12", and so on, until you run out of tulle.  Each new cut is one inch shorter than the previous cut.  (If you're doing a bigger tree, the same principle applies, start with the widest cut and then do each cut after one inch less)

Note: these cuts don't have to be military precise, just pretty close.  It won't matter if you're a little off.  

If you're fussy, you may want to note the size of each section you cut with a piece of  masking tape, so you'll know the correct order for later assembly.  I didn't do that, but you could (I'm thinking of people like my sister Kelly, who would never accept just eyeballing that step).

When you're done cutting your ever-decreasing pieces of tulle, it will look like this:


Step Three:  Sew and gather the layers

Next, you have to fold each piece of tulle in half, long sides together and sew along the raw edges.  So, you'll have a bunch of sections that are 72" long and 7.5 inches wide, 7 inches wide, 6.5 inches wide, and so on.

Hand sew a long gathering stitch along the open end of each section.  Don't sew on the folded side - that will be the outside of the tree.  It's all starting to make sense now, isn't it?

I found using hand quilting thread in a matching color works well for this step.  You could also use embroidery thread.  It's important to use thread that's pretty sturdy, as this makes the structure of the tree possible.  

After you've sewn a wide stitch all along the top, pull on each end to gather the section.  Don't tie off yet - that comes next. You'll end up with a big pile of puffy things like this - I put mine in a bag after I gathered each, to be sure I didn't lose any.


This is a good TV-watching craft activity.  It's the step of the process that takes the longest.  You could probably do this on a sewing machine, but I didn't want to fiddle with tulle and a gathering stitch.  

Step Four: Assembly

Place the dowel inside the sturdy container you're using for the base.  I found an old candlestick that could hold the dowel and keep everything nice and straight.  You could also use a pail or even a mason jar full of marbles or rocks.  It won't be a super heavy tree, so you're just looking for a sturdy base.

Now, starting with the largest puffy gathered section, begin to tie each section to the dowel. (Now's when labeled sections would come in handy.  Or, just eyeball it like I did.)

Tie a knot in back of the dowel, and then wrap the string around once more, and knot again for extra strength.  Adjust the tulle until you're happy with how it looks, and then cut the ends of the gathering string.  Continue all the way up the dowel, adding the next smallest section each time.


When you're all done, you can add a bow or even a tree topper of some sort.  I'm on the hunt for a good one to match my tree.  Until then, I just tied a ribbon to the top of the dowel.

Feel free to share photos or the tutorial on your blog, just please link back to this post.

Please let me know if you have any questions.  And, if you make a TuTu Tree, please add it to my Quilted Cupcake Flickr group. 

Linking to:

Making the World Cuter
Pinkapotamus
Dittle Dattle

Saturday, November 12, 2011

Fun Tutu-torial coming on Monday

Psst- be sure to check the blog on Monday.  I'm working on a new tutorial.  Here's a hint:


LOL!  I promise this dude's not really involved with the tutorial.

Thursday, November 10, 2011

Thrifty Thursdays #5

It's Thrifty Thursday again!  Thanks again to everyone who's been joining the party.  If you haven't joined the fun yet, please consider adding your own fun, crafty, thrifty blog posts, too.  I'd love to see what everyone's working on.  Remember, it doesn't have to be a new post, or a post made on a Thursday.  Older posts are fine, too.

Here's my latest thrifty sewing find:

My mom had one of these wooden sewing boxes, and my boys loved to play with it, stretching the accordion-like shelves in and out. It's been on my "find one at a thrift store" list for a while. I got this one recently for about $5 - the bonus was that inside it, and included for the same price, were 2 pairs of scissors, and the tool for attaching snaps.  Score!
Once I got it home, I realized that I probably have way too many sewing notions for this baby to hold them all. So, I converted it into my Etsy shipping station.  It's perfect!  Now, I can easily find all the bits and pieces I need when I'm pulling together a shipment.  The only thing it doesn't hold is the envelopes.  Hoping this will make the holiday shipping a bit easier.

OK, Your Turn! 
Show us What Crafty Thrifty Things You've Been Doing!


Wednesday, November 9, 2011

Preparing for the Holidays

I'm working hard to prepare my Etsy shop for the holidays.  My sister and I are going to a 12 hour sewing marathon this Saturday, hosted by our guild.  That should help.  It's a great deal - only $5, plus a pot luck dish.

Here are a few new things I've added to my shop recently:

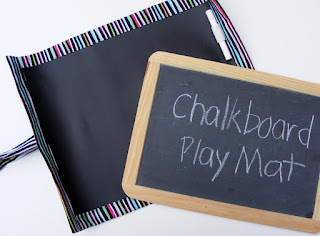
A chalkboard play mat, great for keeping the kiddos quiet and busy.  It rolls up for storage.  Really fun playing with the chalkboard fabric.  I can't wait to make more of these.

Lots of fun Kindle and Nook covers.

I also updated my fabric choices for custom order laptop or tablet cases - you can click on the pictures to make them larger.


Anyone else out there feel like Santa preparing the workshop for Christmas?

Monday, November 7, 2011

Quilt Bingo Winner

My sisters and I recently went to our first quilt bingo, sponsored by our guild. So much fun! All the prizes were quilted or handmade items donated by members. If you won, you got to pick your favorite. I had my eye on this baby all night, thought it would go early. It was still there when I won (note: I've only played bingo a few times in my life, never won). My sister says I almost knocked someone else over to get to it. I dispute that claim - there was a clear path. ;)
I love the colors, and the quilting. No label, so I'm not sure who made it, but we think it was done by a local quilt studio. Love the floral design. It's a generous lap quilt size.  I was just so thrilled to win.

Both of my sisters also won, as did everyone at our table.  Lucky, fun night!

Posted by Picasa

Thursday, November 3, 2011

Thrifty Thursdays #4

Thrifty Thursday is back!  I've been hard at work on a ton of thrifty projects, and can't wait to share them all with you here.

Thanks to everyone who added links last week - let's see if we can break last week's record of 14 posts! 

Here's my thrifty score of the week - another ReStore find. I got an email on Saturday suggesting that I brave the icky rain/sleet weather to visit ReStore because they were offering 20% off the Entire Store! How's a girl supposed to resist that?

 I went looking for old desk drawers that I could upcycle. Found them for $1 each (0.80 after the discount). But that's not even the best deal. My heart started beating a little faster when I turned the corner and saw this:
It was love at first sight.  It reminds me of a bedside table, but it's bigger.  I made up my own "sold" sign and slapped it on it, also removing the price to show to the cashier. I was so afraid someone else would buy it before I could! It's perfectly distressed - better than I could have done if I tried to do it myself.    I'm going to use it in my new shabby chic style studio as a place to display some antique sewing machines and other vintage goodies. Oh, and after the discount, it was $20! I'm going to change out the hardware, so I'll post "after" pictures when she's all done and accessorized.

OK, now it's your turn - what's been happening in your crafty/thrifty world?  Link it up below:

Wednesday, November 2, 2011

Studio Update

Well, half the floor is done in the basement/studio area.  Now, I'm purging and organizing.  Hard to stay on track.  I'm making good use of my Pinterest Creative Studio Spaces board to remind me of the ideas I want to try. Also, here's a new site I just found that has lots of studio storage ideas, cleverly called Crafty Storage. 


As I'm going through this process, I'm wondering if anyone out there has great sewing storage ideas to share.  If so, please leave them in the comments.

Has anyone done the comic book board thing shown on Smashed Peas and Carrots?

And, don't forget, tomorrow's Thrifty Thursday - we had more entries than ever last week (14).  Let's see if we can top that this week.  I know you have great stuff you can share.  I'm pretty flexible - if it's thrifty in any way, please add it to the party!